How to Create a Straight Seam When Crocheting in the Round
This post may contain affiliate links, meaning that I may earn a small commission if you make a purchase. See our disclosure policy for more information.
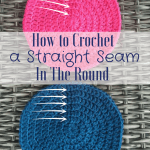
If you crochet, and crochet in the round – hats, bags, coasters etc – chances are at some point or another your seams have been a little, well… wonky. 😐 Mine always veered of to the right (see pink) until I learned this tip to crochet a straight seam.
How to Create a Straight Seam When Crocheting in the Round
I always, always, always start my NEW row IN the same stitch as the join slip stitch. It’s part of what keeps straight edges in crochet. Make sure that your tension is tight enough not to create a gap, and make your first stitch in that same stitch. Give it a try, and let me know what you think!
For many in-the-round patterns you’ll start each row with {for example} ch-2, 2 dc in next stitch, dc in next three sts, 2 dc in next, dc in next three sts, repeat to end, then joining to beginning dc etc. Try reversing the order of the stitches in the pattern, for each round. For example, do the single dc stitches FIRST and then do your double to increase the row.
It would look like this for example:
Wonky Seam:
Row 1: ch-2, 2 dc in each st (20)
Row 2: ch-2, *2 dc in first, 1 dc in next* repeat around, join with sl st (30)
Row 3: ch-2, *2 dc in first, 1 dc in next 2 sts* repeat around, join with sl st (40)
Row 4: ch-2, *2 dc in first, 1 dc in next 3 sts* repeat around, join with sl st (50)
Wanna save this for later?
Straight Seam:
Row 1: ch-2, 2 dc in each st (20)
Row 2: ch-2, *1 dc in first, 2 dc in next* repeat around, join with sl st (30)
Row 3: ch-2, *1 dc in first 2 sts, 2 dc in next* repeat around, join with sl st (40)
Row 4: ch-2, *1 dc in first 3 sts, 2 dc in next* repeat around, join with sl st (50)
If you are new to crocheting beanies I highly recommend reading this article on how to size beanies, including a head size chart AND a master beanie pattern!
After your beanie reaches the neccessary crown width (see the chart here for measurements) start joining your rounds using the YARN UNDER method. All this means is that instead of slip stitching by yarning OVER as normal, you use the more awkward (but nearly-invisible-so-its-worth-it) yarn UNDER. Simply hook the yarn the “wrong way” for the slip stitch only.

I think you’ll like these:
How to Weave in Yarn Ends {So They Don’t Come Out}
9 Tips for Traveling with Crochet
Tapestry Needles Explained: Yarn Needles for Beginners
How to Keep Straight Edges in Crochet
How to Crochet The Single Crochet (Video Tutorial)


50 Comments