Female Dog Diaper for Dogs in Heat Crochet Pattern
This post may contain affiliate links, meaning that I may earn a small commission if you make a purchase. See our disclosure policy for more information.
Do you have a female dog in heat? Then you need a Female Dog Diaper and we have a free crochet pattern! Use this customizable dog diaper crochet pattern to make one for your furry friend.

Female Dog Diaper for Dogs in Heat
There are various reasons people choose not to spay their dogs, or to let a few heats happen before doing so. If you find yourself in that position, you’ll inevitably need a doggy diaper for when she goes into heat.
Sizes (and shapes!) vary greatly from dog to dog, so use this pattern as a guide to make a diaper exactly the right size for your female in heat. This free crochet pattern is better than store bought female dog diapers because it is customizable, the cotton yarn is washable and the pattern works up quick!
Because you will crochet your female dog diaper to fit your specific dog’s needs, you will want to have your dog handy and measure/check size as you go. For reference, I used my twelve pound Yorkie in order to create the pattern. Remember that the part we are really needing to protect is just under the tail, so start the opening for the tail as high up as possible when you get to step 9 below.

Need a male dog incontinence band instead? We’ve got you “covered”. See what I did there?! 😛
Materials for dog diaper:
Worsted Weight Cotton Yarn
*I used about one skein for a small diaper
Crochet hook in size G/4mm
If you need help reading a crochet pattern, make sure you head over here and check out this detailed post.
Pattern:
Note: The larger the dog, the longer the beginning chain, as it will wrap around their waist. Make sure to measure against your pooch as you go.

Find photo examples below…
- To start the waist band, chain 70(ish) and check length by wrapping around your dog’s waist; you’ll want it to overlap by only an inch or so. It will shorten up a bit as you crochet back through the chain.
- When desired length is reached, single crochet in the second chain from hook and in each chain across.
- Ch-1, turn, sc in each st across.
- Repeat step 3 for about 15 rows, checking width around your dog’s waist as needed.
- Fasten off and weave in ends.
- Decide how wide the actual diaper portion needs to be. Hold the crochet up to your dog and gauge the distance between her back legs. For my 12-lb Yorkie I did the width of my palm (14 sts). For my 45-lb German Shorthair Pointer I made the center 20 stitches wide.
- Make sure it is centered before moving on, and attach yarn in appropriate spot. (see first example photo below)
- Ch-1, turn, sc in each st across.
- Repeat step 8 for about 20 rows. Check the height against your dog. You want this strip to stop when it sits right under her tail so that it will offer the most protection while she is in heat. Now create the tail opening.
- Sc across the first half of diaper only (see photo below). In my case since I did the diaper portion 14 sts wide, I single crocheted in the first 7 sts only.
- Ch-1, turn, sc in each stitch across.
- Continue sc rows for about 14 more rows and check tail opening height. Need more room for the tail? Keep adding rows.
- When the tail opening height of the first side is reached, fasten off and weave in ends. *note: I found it best to finish the first side of the tail opening with a row working toward the middle (see photo below). This way when the second half of the tail opening is finished, we can more easily attach the two sides together to finish the diaper.
- Attach yarn to create the other side of the tail opening. Sc in each unused st across, and continue sc rows until the height is the same on both sides. (see photo below)
- To attach the two sides of the tail opening together: ch-1, turn, sc in ALL sts across (including both sides of the tail)
- Ch-1, turn, sc in each st across.
- Repeat step 16 until the end is long enough to reach up to the dog’s waist. Do not fasten off…
- Single crochet around the entire perimeter as in this tutorial.
- Fasten off, weave in all ends.
- Place your Velcro on the top side of the diaper portion and attach the opposite side of the Velcro to each side of the waist band. If you’re overlapping the band (IMO it works better for more active dogs to overlap them) make sure you’re adding Velcro to all appropriate areas (4 patches total).
- Use a needle and thread to secure the Velcro around all sides (even if you used the self-stick, you want it to hold STRONG)
- Place a pantyliner directly under the tail hole and voila! Your female dog diaper is complete!
See photo examples of the placements:

Wanna save this for later?
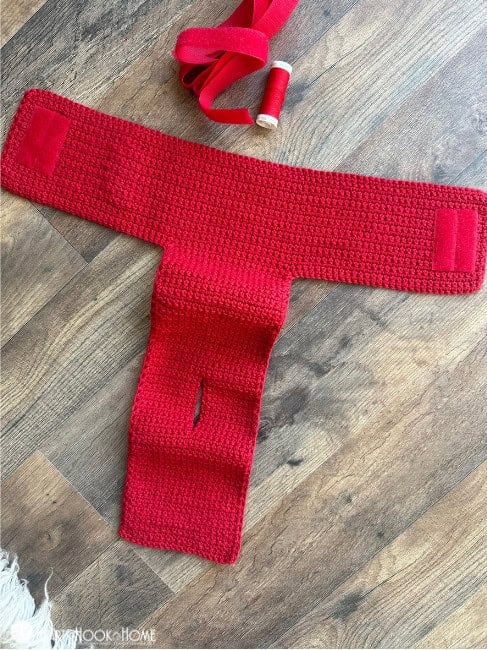
Belly band done. Starting on the diaper portion.

First half of tail opening is finished!

Start the second half of the tail opening in the very first available stitch.

Both sides of tail opening complete! Now to crochet across both sides until tall enough to reach the her back…

Make sure you use needle and thread to make the Velcro SUPER secure. You don’t want it falling off.

Add a feminine pad (you may need to fold it under just a bit) and you.are.done!

Didn’t that turn out great?! Once you get the first female dog diaper finished you’ll know exactly how many rows to make any subsequent diapers. And we all know you need a minimum of two. WIN!

More crochet patterns for dogs:
Male Dog Incontinence Band Crochet Pattern: A Piddle Protector for Pooches
Doggie Donut: Dog Collar for Surgery OR Wrought Iron Fences (Free Crochet Pattern)
And you definitely want to try your paw at these…
Easy Homemade Pumpkin Dog Biscuits


10 Comments